Soaking Up the Sun in Style: The Rise of Solar Pergolas
Solar pergolas are a unique blend of functionality and aesthetics, offering a compelling option for homeowners looking to expand their usable outdoor space while embracing renewable energy. Here’s a closer look at why people are opting for solar pergolas and the benefits they provide:
Motivations for a Solar Pergola:
- Harnessing the Power of the Sun: The primary reason for a solar pergola is to generate clean, renewable energy. The pergola’s roof structure becomes a platform for solar panels, converting sunlight into electricity that can be used to power your home or even fed back into the grid.
- Expanding Usable Outdoor Space: Pergolas themselves create a shaded and defined outdoor area, perfect for relaxation, entertaining, or enjoying a meal outdoors. By integrating solar panels, you gain this valuable outdoor space without sacrificing valuable rooftop real estate for solar panels.
- Aesthetics and Design: Solar pergolas can be beautifully designed to complement your home’s style. They offer a more visually pleasing alternative to traditional roof-mounted solar panels, potentially enhancing your home’s curb appeal.
Benefits of a Solar Pergola:
- Reduced Energy Bills: The electricity generated by the solar panels on your pergola helps offset your home’s energy consumption, potentially leading to significant savings on your electricity bills.
- Increased Home Value: Homes with solar power systems are often viewed as more sustainable and desirable, potentially increasing your home’s value when it comes time to sell.
- Environmental Friendliness: By generating clean solar energy, you reduce your reliance on fossil fuels and contribute to a greener environment.
- Dual Functionality: You gain a beautiful outdoor space while simultaneously generating clean energy, maximizing the return on your investment. as well as adding some shade..
Design and installation
Pergolas offer a versatile outdoor structure that can be used for a variety of purposes. Here are some of the typical use cases for a pergola:
- Creating Shade and Comfort: The primary function of a pergola is to provide shade from the sun. This allows you to enjoy your outdoor space comfortably, even on hot and sunny days. You can place seating, dining areas, or even a hammock under the pergola for a relaxing retreat.
- Outdoor Entertaining: Pergolas create a defined outdoor area perfect for entertaining guests. You can set up a BBQ grill, outdoor furniture, or even a small bar under the pergola for gatherings and parties. The shade and protection from the elements make it a more inviting space compared to being directly exposed to the sun.
- Extending Living Space: Pergolas essentially function as an extension of your living space to the outdoors. They can be used to create a designated area for outdoor dining, reading, relaxing, or enjoying hobbies. This allows you to seamlessly blend indoor and outdoor living.
- Defining Outdoor Areas: Pergolas can be used to visually define different areas within your outdoor space. For example, you can use a pergola to separate a patio from a garden or create a designated lounging area.
- Supporting Climbing Plants: The structure of a pergola can be ideal for supporting climbing vines and plants. This can add a touch of greenery and natural beauty to your outdoor space, while also providing additional shade.
- Protecting Outdoor Furniture: A pergola can help protect your outdoor furniture from harsh weather elements like direct sunlight, rain, and even hail.
- Poolside Shade: Pergolas are a popular choice for creating a shaded area near a pool or hot tub. This allows you to cool down and relax after enjoying a swim.
- Carport Alternative: While not the most secure option, some people use pergolas as a lightweight carport to provide some shade and protection for their vehicles.
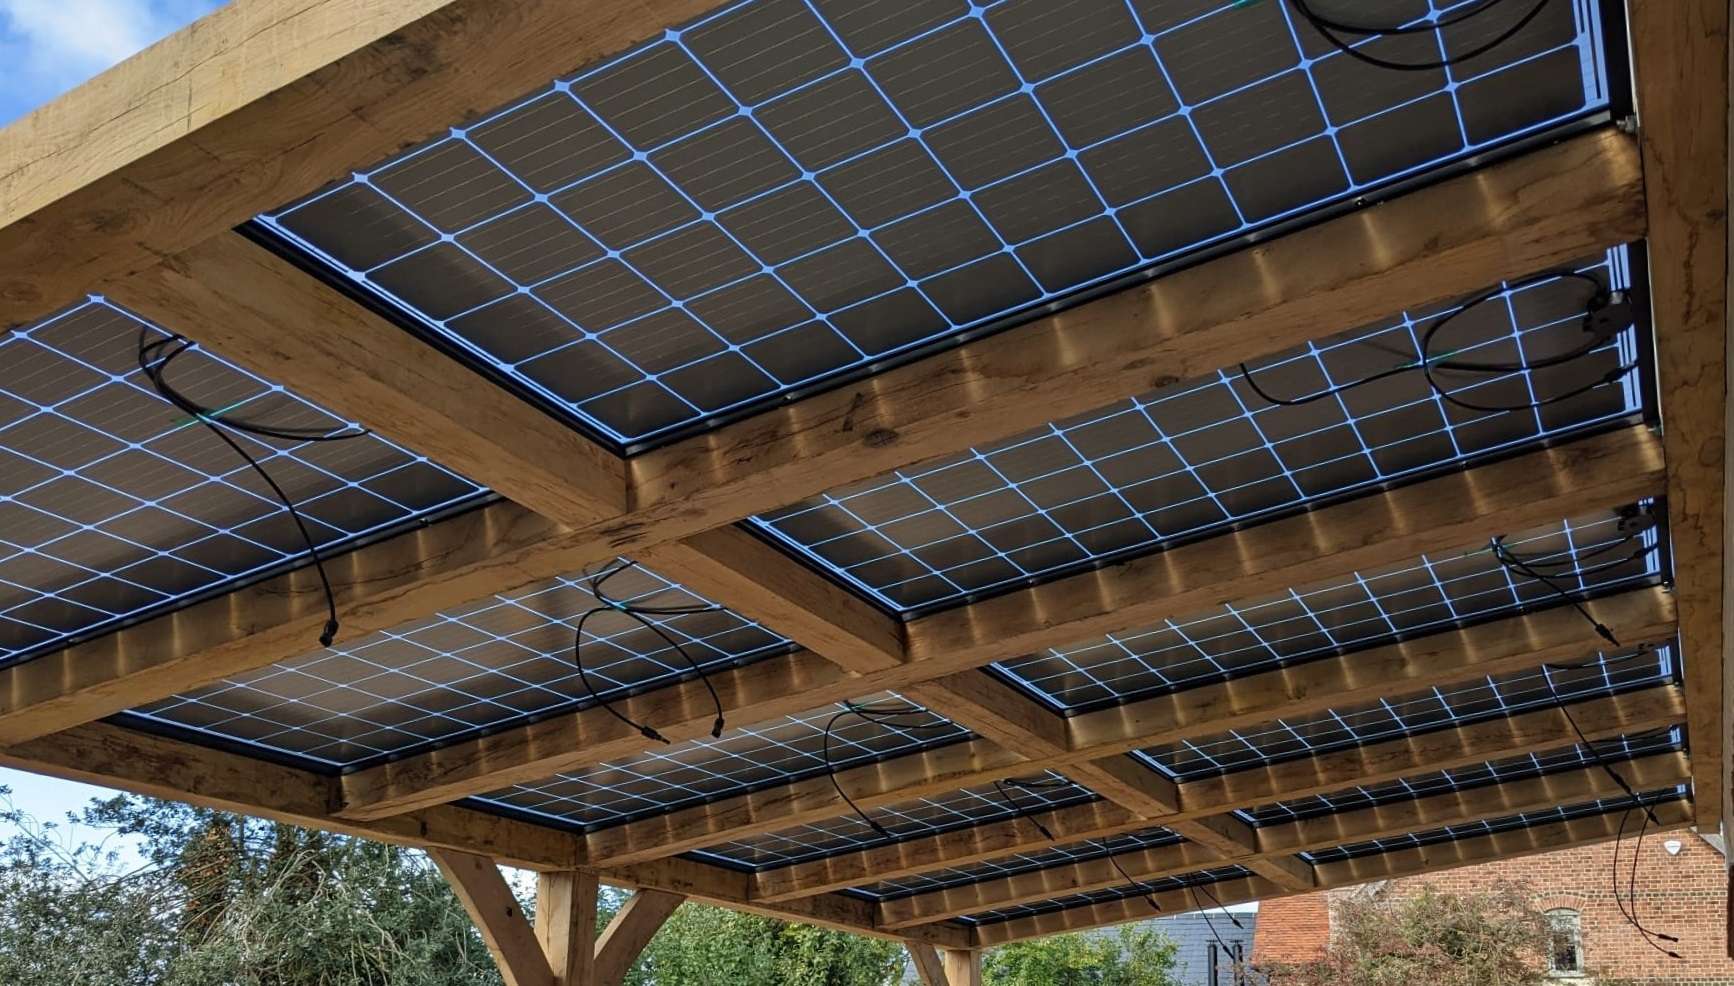
Off the shelf pergolas may offer support for the fitment of solar panels but this is usually unlikely. bespoke design services can be made to support solar panels. The costs vary depending on size and materials the main image above is oak and holds 12 solar panels. You may wish to consider bi facial panels, these have solar cells on both sides and harvest from reflective light. typically the panel rating is greater than 550 watts.
Fixing the pergola to the building, also known as a lean too. makes for greater stability as they are anchored to the building itself, it is important to place damp proofing between the pergola and the wall to allow for drainage.
You can opt for 7×2 timbers, which are used in the making of floors and pergolas, however they would need to be sanded to remove the standards markings which is printed on them. C16 is a standard grade but each would cost around £21.00. you would need to trim them to fit the panels depending on the size and how you fit the panels to the pergola itself.
You may want to weather seal the panels which you would use a item called a T seal.
You would use different sizes depending on where the seal was and you would have to calculate the size additions of adding both the seal and the fitting.

Free standing or attached to the building you do need to consider loads, wind and what is call racking. This is where something twists. a heavy frame will add weight to stop uplift but the legs should be well supported for both uplift and weigh loads. you may wish to sink posts or use ground screws.
Fixing the panels can be as simple as a screw with a large head, to mini rails and under side clips.
Underside clips fix to the frame sides, pinching the panels down and go onto the side of the frame securing the panel to the frame. From the top, large bolt/screw heads effectively work like clamps, but as they fit between the panel they create a gap. Rails would create space between the frame and the panel and fixed with standard panel clamps.
Hiding cables will be the hard task to work out just how you will do this. you can put on masking plates which would allow you to put the wires out of sight. you could line the under side of the pergola in effect making a closed roof space. Thin ply makes for a tidy installation, just make sure you have got no leaks before sealing the bottom and decorating.
Lets check out some maths. ( this may be gobbley gook if you don’t build and design)
a 3.6 meter timber frame
425w solar panel Width 1134 mm length 1722 mm
We can have 3 panels width ways, that would amount to 3.402m this would be the outward span of the pergola. We can then have 2 panels running along 3.444m. this would give us 6 panels and a watt peak of 2550watts.
using the 7×2 timbers which are 45mm wide..
We fix a “wall plate” if we are on a building with the correct bolts. we know this needs to be centered at 3.444m less timber W. (90mm because there are two ends)
The angle we pick, with tilt the top edge of the panel away from the wall and we need to account for the width of the timber.
The higher on the wall, the move head space it will give us. We want to have the minimal height of 1.9 meters as this will go over the heads of most people. The angle will depend on the array type and use case, winter will want to be steeper and summer would want to be at least 12 degrees.
Then we need to cut the spars, they will be angle cut. the leader ( long side) would center at 3.402m the end spars would of course be longer to cap the end, the end being cut to the correct length to fit within the end spars. or over the ends depending on the design finish.
Remembering to offset the other end to make a true finish (straight end on the lower side).
the noggs ( would be trimmed to fit within the spars) would need to be fitted where they support the fixing type for both sets of panels.
it is prudent to block the legs to take the weight and to fit a small collar to to support the frame, you may wish to tonged the fitments in the centers to make for a clear finish, but find that they can be more of a problem for the novice builder as the construction has to be in order in order to fit the frame together.
When fixing the panels, if you are bolting L clamps, you will find where the panels join together the width is wider that the timber our panels typically are 15mm meaning that back to back with a seal strip they would be 32mm. Top clamp will be 34mm, railed would be 36mm. you need to take this into account when measuring out where the panels will be and cutting and placing the timbers.
When bolting to L clamps you will need to test fit and push down on the panel to mark the timber tops, this will show you where you need to counter sink holes for the bolt heads to bed down and fit the panel flush.
I should mention that a landscape panel arrangement (long and thin) could be made with 4×2 as would covered walk ways. you would frame differently for single panels and could “lose the legs” allowing for a cantilever style design.
You could cheat a little with this ready made £95 solution from B&Q you would need to modify the lengths to support a panel, however only on the ends as the frame should support itself. ideal for small solutions and those with limited space.

Your outer edge should be a suitable height to walk under. if you target a angle this could be an issue as you would have to move the wall plate up higher to compensate. most panels require an angle of 12 degrees in order to self clean. but you should look at our tilt and angle information.
You would need 7 timbers, and two posts.
£202 in timber
6 panels. £469.20.
32 screws £25 ( use proper screws not just wood screws)
4 wall bolts £5
ground screws £61.
£762.20 — 2687kWh
No responses yet