The first problem with garden solar is the planning and regulations that you need to meet, so lets get those out of the way, and I’m sure that you have looked into this and have what you need for either the permitted development or sought planning.
We had AI produce the images for this, and well, its no engineer….

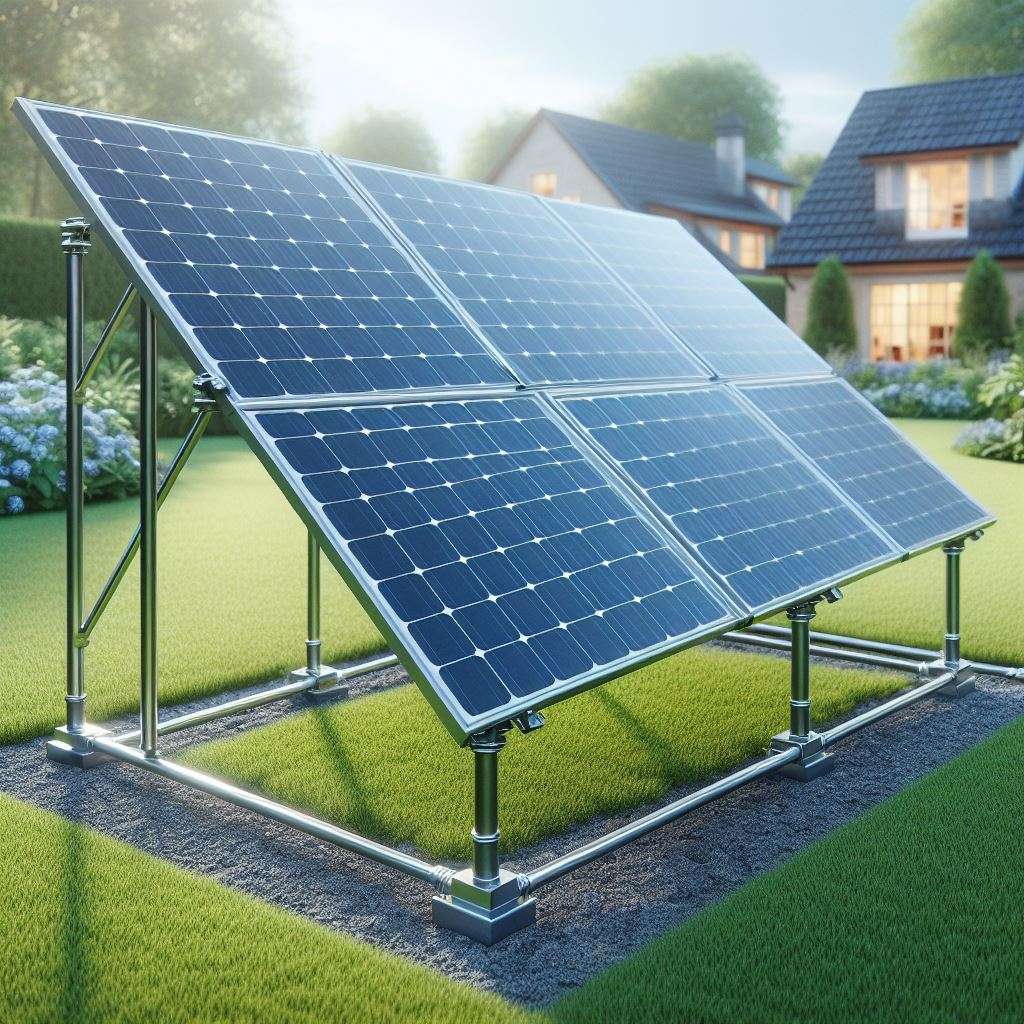
Im going to look at two materials, though many of you would use wood, the costs and life span vary between them, Scaffold and Unistrut.
Scaffold I am sure you know what this is a thick galvanized hollow pole. used on the outside of a building, on public hand rails for stairs, and as fencing. Unistrut on the other hand is a slotted C channel typically used as framing, they hold wires, false ceilings, walk ways, under machines, its smaller and more discrete I guess. but its hidden away and its a lot like Lego.. technical Lego..
UNISTRUT
Unistrut framework with hinged top. You can then use design software or consult with an engineer to create detailed drawings. Here are the key steps and considerations:
- Framework Overview:
- Start by envisioning the overall structure. You’ll have three legs using Unistrut channels.
- The front leg will have a hinge at the top for adjustability.
- The back legs will connect to the front leg using 90-degree brackets and hinge.
- The legs are individual, so you can extend.
- Single Leg Design:
- Begin with a single leg.
- Attach a hinge to the top of the front leg on the flat side. This hinge will allow you to adjust the angle of the leg and solar panel.
- The front leg brace, is a smaller length. There is a hinge to the end connection to the front, Then the other has a bracket will connect to the back legs attached with 90-degree bracket.
- The brace should be in the Upper part of the leg to stop movement.
- Solar Rails:
- On the front side (Over the legs), run 3.3 meters of solar rails. Space the legs 1.4 meters apart.
- These rails will provide support for solar panels.
- Solar panels clamp to the rail as usual.
- Stability Considerations:
- To enhance stability, consider the following options:
- Bottom Rail on Rear Leg: Running a solar rail along the bottom of the rear leg can add stability.
- Mid-Height Rail: Position a solar rail halfway up the rear leg.
- Two-Thirds Down Rail: Place a rail two-thirds down the rear leg.
- The solar panels themselves will also contribute to stability.
- To enhance stability, consider the following options:
- Adjustability:
- Test the hinge’s movement range to ensure it allows the desired adjustments.
- Make sure the 90-degree bracket doesn’t hinder movement.
- Repeat for Other Legs:
- Create two more identical legs following the same design principles.
- Consistency is crucial for stability and aesthetics.
The Unistrut route will cost around £165.00, the lower back leg should be used for ballast to hold the array in place, the other option would be to make a anchor. You can use a number of things to anchor the array, a ground screw, a concrete slab with a hanger. What you should not do is fix the ends of the legs to the ground, to do so will make the array fixed. and if you read our solar panel tilt and angle adjustment you would know that you will want to move it around 3 times a year.
Full Kit ground array.
Solar roofing mount and kits can costs in excess of £7,000 but this is with a battery, for grid tied ( day time solar) you are looking around £1,000 for a 2 kw system. the comprises four solar panels and micro inverter as well as the frame and some cables that you would need to get the array producing power, other things will be the SWA cable, the isolator and final wiring.
Scaffold solar array
Scaffolding is a cost effective installation material, you will find this is like Lego too, so you will need only a few tools to set this up, but there are a few options to how to do this.
Scaffold is used a lot for vertical mount solar systems. “Fence Solar”. The panels can be attached with C clamps, this requires drilling the extra hole to fit the clamp. or use the Lug clamp; these are much thicker and they fit to the bar, but you have to be accurate with your mounting and full array or you will be off kilter and the cost goes up by around £20 per panel mount..
T connections are used in the mid points and for the end frame aside from two 90’s on the top ends

When looking at providing a kit, and to add flexibility, we would use quad 90s with a 90 center. This means that you can add tilt to the panels making it more practical for use all year around.
The poles are mounted into the ground as “stubs” usually taking a straight line approach. This means that forward thinking is critical for your “peak” time. Again see the links above regarding tilt and angle as well as positions and seasonal information.
On the quad, you mount the cross pole and the additional vertical taking care to measure the lug or C camp position and the holes to what length these need to be. If you are fixed vertical, they can be mounted on the verticals, or they should be mounted on the horizontals for tilts.
For tilting, you would space the main vertical away from any thing on the back, this will allow you to keep the length though the 90 vertical forward. so you push this to change the angle. on the end ( outer most) you would need to hinge before the adjustable vertical. this is because the length between the two horizontal bar will change dependent on the angle. The “flop” of the bar swings up and down to increase and decrease the length between the two poles. You do still need to have the Lower horizontals between the uprights.
2000W scaffold Kit –
A full kit with panels and grid tied inverter would cost around £1,075
ROI
Important to most people is the return, how long before it pays off?
I will price both of these as a total price around £1300. this is 8,162kWh
Annual Production would be around 3,300kwh (£957) = ROI 1.358 years.
We based these figures on kWh price of £0.29 6 sun hours for 275 days of the year.
the weather will make a difference as will your location and installation position and angle as well as any shading. we find we are pretty accurate with all our installations, but this will be for you to check, but no one can predict the weather. your low should be 2,200kwh (£638) or around 2 years ( not calendar again).
Head to our shop to find deals..

Want to go hybrid and a battery?
Without doing the math and practical assessment you would need to add £2,700 ish to the cost, that would be a 10kwh battery.
I would recommend building a “plant room” near the array for this if this is your chosen path. this is a mounting place for the inverter and the battery, with some cover, but not totally enclosed. but you do need to keep the battery temperature stable.
No responses yet